Showing posts with label artrage. Show all posts

Thursday, October 7, 2010

ArtRage Tutorial – Canvas Positioner

Saltar al español

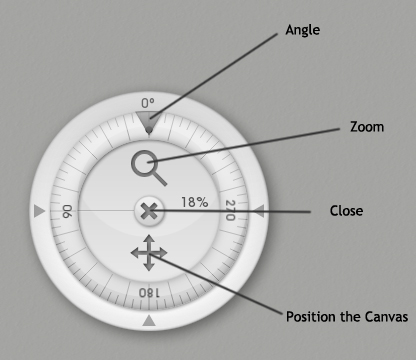
The canvas positioner is a very useful tool when you're painting in ArtRage, you can pop it up by clicking the canvas icon on the menu on top.

With this tool you can zoom, rotate, or move the canvas, it's a good idea to have it showing all the time to save some time, though it can take some space on the program, so you'll need a decent sized monitor.


Rotating the canvas is one of the most important things you can do with this tool, you can find an angle you're comfortable painting with or look at your composition from different points of view. While we're on the subject, you can flip the look of your canvas horizontaly by pressing H or vertically by pressing V on the Keyboard, this isn't a feature of the canvas positioner tool, but I won't write another tutorial just about that.

Questions or suggestions?

Drop an email to contact@bananaorange.com

--------------------------
Spanish

Tutorial de ArtRage – Canvas Positioner

El posicionador de lienzo (canvas positioner) es una herramienta muy útil cuando se está pintando en ArtRage, se puede encontrar haciendo click en el ícono de lienzo ubicado en el menú superior.

Con esta herramienta se puede hacer zoom, rotar, o mover el lienzo, es una buena idea tenerla siempre en el escritorio para ahorrar algo de tiempo, aunque puede tomar algo de espacio en el mismo, por lo que se necesita un monitor con un tamaño decente.


Rotar el lienzo es quizás la función más importante que se puede hacer con esta herramienta, puedes encontrar un ángulo con el que estás cómodo para pintar, o mirar tu composición desde distintos puntos de vista. Mientras estamos en este tema, también se puede voltear el lienzo horizontalmente presionando H, o verticalmente presionando V en el teclado, esta no es una de las características de posicionador de lienzo, pero no escribiré otro tutorial solo acerca de eso.

¿Preguntas o Sugerencias?

Envíen un email a contact@bananaorange.com


Bookmark and Share

Friday, August 27, 2010

ArtRage Tutorial – Stencils

Saltar al español

One of my favourite ArtRage tools is the stencil, if you know how to use them they can be a very powerful tool.

Although I don't normally use the standard stencils that ArtRage has, I've come up with a way of giving a little texture to my artwork by using stencils.

All you need is a good texture image, in black and white and with a very high contrast, then just bring the image as a stencil by going to Tools > Stencil Options > Select Stencil From Disk.


When you bring an image as a stencil the black part becomes transparent and the white is opaque, the grays become different levels of opacity. Now you just need to paint on top of the stencil, and the paint won't go through the opaque part of the it, leaving a distinct texture or shape, like in the next image.


The stencil can be inverted too, this is especially useful to put a higher contrast between the shapes or just using different colors without mixing them and ruining the texture.


Of course you can also rotate, flip, and scale the stencil too.

Questions or suggestions?

Drop an email to contact@bananaorange.com
--------------------------
Spanish

Tutorial de ArtRage – Stencils

Una de mis herramientas favoritas de ArtRage son los stencils, si es que sabes como usarlos son una herramienta muy poderosa.

Aunque normalmente no uso los stencils estándar que tiene ArtRage, idee una manera de usarlos para darle un poco de textura a mis trabajos.

Todo lo que se necesita es una buena imagen de textura, en blanco y negro con un contraste muy alto, luego simplemente se trae la imagen como un stencil al ir a Tools > Stencil Options > Select Stencil From Disk.


Cuando traes una imagen como stencil, la parte negra se vuelve transparente y la blanca es opaca, los grises se transforman en distintos niveles de opacidad. Ahora solo hay que pintar sobre el stencil y la pintura no atravesará la parte opaca, dejando una textura o forma distintiva, como en la siguiente imagen.


El stencil también puede ser invertido, esto es especialmente útil para poner un contraste mayor entre las formas, o simplemente usar colores distintos sin mezclarlos y arruinar la textura.


Por supuesto, también puedes rotar, voltear y escalar el stencil también.

¿Preguntas o Sugerencias?

Envíen un email a contact@bananaorange.com


Bookmark and Share

Thursday, August 12, 2010

ArtRage Tutorial – Square Head

Saltar al español

I decided to write two ArtRage tutorials in a row since I couldn't come up with a theme for the other column last week, and I had to write something while I'm waiting for inspiration to strike me.

The final option of the oils is the “square head” one, which simply consists in selecting a flat brush instead of the usual round one.


This brush has the peculiarity that it's size doesn't obey the pressure of the stylus, after all, since it's a flat brush you can't lay a portion of it on the canvas (although I guess if one were to incline the brush one could place the tip on the canvas, but since I don't have a tablet that detects inclination in the stylus I haven't been able to verify this).

I usually use this brush for constructions and “square” objects, although it can also be used to give a more angled look to a face or cloth folds, it really depends on what you want to communicate with the brush stroke.

Questions or suggestions?

Drop an email to contact@bananaorange.com
--------------------------
Spanish

Tutorial de ArtRage – Square Head

Decidí escribir dos tutoriales de ArtRage seguidos ya que la semana pasada no se me ocurrió un tema para la otra columna, y tenía que escribir algo mientras la inspiración llega.

La última opción de los oleos es la de “square head” que es simplemente seleccionar un pincel plano en vez del más redondo para trabajar con él.


Este pincel tiene la particularidad de que su tamaño no es ajustable según la presión que se ocupe, después de todo, como es un pincel plano solo se puede posar entero sobre el lienzo (supongo que si es que uno inclinara el pincel puede posar una punta del mismo, pero ya que no tengo una tableta que detecte la inclinación del stylus no he podido verificar esto).

Generalmente ocupo este pincel para construcciones y objetos “cuadrados”, aunque también puede ser ocupado para dar un aspecto más duro u anguloso a los rostros o pliegues de la ropa, depende de lo que se quiera comunicar con la pincelada.

¿Preguntas o Sugerencias?

Envíen un email a contact@bananaorange.com


Bookmark and Share

Thursday, July 29, 2010

ArtRage Tutorials Archive

Saltar al español

To make it easier to find them, this blog post will be updated with all the ArtRage tutorials I make.

ArtRage Tutorial - Auto Clean

ArtRage Tutorial - Insta Dry

ArtRage Tutorial - Loading

ArtRage Tutorial - Pressure

ArtRage Tutorial - Thinners

Questions or Suggestions?

Drop an email to contact@bananaorange.com
--------------------------
Spanish

Archivo de Tutoriales de ArtRage

Para hacer más fácil de encontrar los tutoriales, de ahora en adelante serán archivados en este post, que actualizaré regularmente.

Tutorial de ArtRage - Auto Clean

Tutorial de ArtRage - Insta Dry

Tutorial de ArtRage - Loading

Tutorial de ArtRage - Pressure

Tutorial de ArtRage - Thinners

¿Preguntas o Sugerencias?

Envíen un email a contact@bananaorange.com


Bookmark and Share

ArtRage Tutorial – Auto Clean

Saltar al español

The auto clean option is very fun and useful if you know how to apply it, although to tell the truth I don't use it that much, I'll start paying more attention to it.

When we open ArtRage auto clean is selected in the oils dialog by default, this means that each time we lift the brush (or well, the stylus) it's cleaned automatically and we acn apply clean brush strokes with the color we selected.

However, without auto clean, the brush isn't cleaned when we lift it off the canvas, so each time we apply it, it takes a bit of the color that's already been painted, gradually mixing the 'pigments'. This is obviously very useful to blend colors. If we want to clean the brush, all we have to do is click on the glass located near the bottom-right corner of the screen, the water on the glass also gets dirty with each time we clean the brush on it.


In the first part of the image auto clean is off, we can see how the color is blended with each stroke applied, once the color has vanished, I cleaned the brush and applied a second series of brush strokes, although you can't tell that much, but you can see were the brush initially touched the canvas in the second 'blue' stain, it has a much richer color.

However with auto clean on, each stroke we apply has the original color, there's no need to clean the brush, and as you can see, the second stain doesn't have much of a difference with the first one, they both have a pretty strong blue.

Even with auto clean off, when you select a new color the brush is cleaned automatically, I guess since we don't want to stain our pallete with the brush, the program assumes that we cleaned everything real nice, that's good thinking.

Questions or suggestions?

Drop an email to contact@bananaorange.com
--------------------------
Spanish

Tutorial de ArtRage – Auto Clean

La opción de auto clean es muy entretenida y útil si se ocupa bien, aunque a decir verdad yo no la ocupo lo suficiente, le estoy empezando a poner un poco más de atención.

Por defecto, cuando abrimos ArtRage auto clean está seleccionada en el cuadro de settings de los oleos, esto significa que cada vez que levantamos el pincel (o bueno, el stylus) este se limpia automáticamente y podemos aplicar pinceladas con el color puro que está seleccionado.

Sin embargo con la opción de auto clean deseleccionada, el pincel no se limpia cuando lo levantamos, así que cada vez que lo aplicamos sobre otro color también va tomando un poco de este y mezclando los 'pigmentos'. Obviamente esto es muy útil para realizar mezclas uniformes de colores. Si queremos limpiar el pincel todo lo que debemos hacer es hacer click en el vaso de agua ubicado cerca de la esquina inferior derecha, el vaso también se ensucia con el color que ocupamos.


En la primera parte de la imagen anterior la opción de auto clean está desactivada, podemos ver como al aplicar color este se va mimetizando cada vez más con el amarillo que ya está puesto, una vez que el color ya se ha desvanecido mucho limpié el pincel y apliqué una segunda serie de pinceladas, aunque se aprecia poco, se alcanza a ver donde el pincel reposó en el lienzo inicialmente en la segunda mancha azul, esa parte es de un color mucho más puro.

En cambio con auto clean activado, cada pincelazo que apliquemos va a ser del color original, no hay necesidad de limpiar el vaso y como pueden ver, la segunda mancha es parecida a la primera también, con un color bastante puro.

Incluso con auto clean desactivado al seleccionar un color nuevo el pincel se limpia automaticamente eso si, supongo que como pintores no queremos manchar nuestra paleta con el color anterior así que el programa asume que limpiariamos muy bien todo.

¿Preguntas o Sugerencias?

Envíen un email a contact@bananaorange.com


Bookmark and Share

Thursday, July 15, 2010

ArtRage Tutorial – Insta Dry

Saltar al español

Continuing with the characteristics of the oils in ArtRage we have the Insta Dry option.

As it's name indicates, insta dry allows to instantly dry the painting as soon as we place it on the canvas, because of this it's impossible to mix colors while the insta dry ticket is selected. Because of this the option is pretty useful to lay plain colors in the beggining layers and eliminate the white of the canvas.

The other thing about insta dry is that it doesn't allow changes in the brush pressure either, the percentage you have selected is what'll come out of the bristles, so if you have a very high pressure selected the impasto will be really noticeable. Here are some images.


You can see how the appearance of the painting changes with the different options.

When you have insta dry activated and try to paint over an impasto image with a lower pressure the program will respect the highest impasto, to 'make holes' in the painting we have to unselect insta dry.


You can clearly see the difference of levels in the image, you can create really interesting textures this way.

Questions or suggestions?

Drop an email to contact@bananaorange.com
--------------------------
Spanish

Tutorial de ArtRage – Insta Dry

Continuando con las características de los oleos en ArtRage, tenemos la opción de Insta Dry.

Como su nombre lo indica, insta dry permite que la pintura digital que ponemos en el lienzo se seque inmediatamente, debido a esto es imposible mezclar colores mientras el ticket en insta dry esté activado, por lo que es una opción muy útil para poner colores planos en la ilustración, como cuando se está trabajando en las primeras capas y se quiere eliminar el blanco del lienzo.

Existe otra particularidad de insta dry, y es que no permite cambios en la presión del pincel tampoco, el porcentaje que se tenga seleccionado será lo que saldrá de las cerdas, por lo que si uno tiene una presión muy alta seleccionada, el impasto que sale en la pintura es realmente notorio. Aquí hay unas imagenes.


Se puede ver como cambia la apariencia de la pintura con diferentes opciones.

Si al tener insta dry activado pintamos con la presión más baja en una zona con mucho impasto tenderá a respetar el impasto más alto, para 'hacer hoyos' en la pintura tenemos que sacar la opción de insta dry.


Se pueden apreciar claramente la diferencia entre niveles en la imagen, esto puede resultar realmente útil para crear texturas.

¿Preguntas o Sugerencias?

Envíen un email a contact@bananaorange.com


Bookmark and Share

Thursday, June 17, 2010

ArtRage Tutorial – Loading

Saltar al español

Continuing with the options of the oil tool in ArtRage we have the loading slider which represents how much paint you use on your brush. This slider can be found in the settings dialog next to the pressure and thinners options.

This is probably option I less use in ArtRage, in fact I think I've never left the loading slider in less than 100%, which is an almost infinite oil on the brush. This is because I tend to paint with a really thick impasto.


However the fact that the paint runs out is pretty useful in ArtRage, as you can see in the previous image, when the brush is drying out the painting looks very different because it begins to grab the paper's texture and it becomes a lot more transparent and uneven. The brush also picks up the fresh painting on the canvas as you paint, this can be seen in the last stain on the image, a dry brush that runs through the painting is loaded with that color, mixing the colors on the brush itself. This means that a dry brush can also be used to blend, if you just leave loading in zero, which would be a totally dry brush, the only thing it'll do is mix paintings already laid on the canvas.

Questions or suggestions?

Drop an email to contact@bananaorange.com
--------------------------
Spanish

Tutorial de ArtRage – Loading

Continuando con las opciones de los oleos en ArtRage tenemos la barra de 'loading' que representa cuanta pintura uno hecha en el pincel. Esta barra puede ser encontrada en el diálogo de settings junto a las opciones de presión ('pressure') y medium ('thinners').

Esta es quizás una de las opciones que personalmente menos uso en ArtRage, de hecho creo que jamás he dejado la barra de loading en menos de 100%, que es un oleo casi infinito en el pincel. Esto es porque tiendo a pintar con un impasto realmente grueso.


Sin embargo el hecho de que se acabe la pintura en ArtRage tiene distintas utilidades, como pueden ver en la imagen anterior a medida que el pincel se va secando la pintura luce muy distinta, puesto que empieza a tomar más la textura del papel y se vuelve algo más transparente y dispareja. El pincel también va recogiendo la pintura fresca en el lienzo, como se aprecia en la última mancha de la imagen, un pincel seco que pasa por encima de la pintura se carga con este color, mezclando colores en el pincel. Esto significa que el pincel seco puede ser utilizado también para mezclar colores, si es que se pasa el pincel con loading cero, es decir totalmente seco, lo único que hará será mezclar pinturas ya puestas en el lienzo.

¿Preguntas o Sugerencias?

Envíen un email a contact@bananaorange.com


Bookmark and Share

Thursday, June 3, 2010

ArtRage Tutorial – Pressure

Saltar al español

One of the things that make ArtRage a great program is the oil's impasto, this is the volume of painting that you can see when aplying a brush stroke. This is controlled by the “pressure” option.

This is a rather simple painting notion, when you put more pressure on the brush (or the stylus in this case) the more you'll be able to see the trail of the bristle.

In the next image you can see hiw the different levels of pen pressure change the way the painting looks, if we also apply thinners the trail of the brush will not be very visible since it leaves a very thin layer of painting.


I think this is something very basic but interesting to use, I usually leave the pressure at 100% to obtain a very thick impasto with heavily marked bristles, then as I'm adding more and more details I work with a small percentage of thinners or reduce the impasto a bit in some areas. This doesn't mean that you have to work this way, an illustrator I know uses 40% pressure and his works are incredible.

You can find the pressure option in the settings dialog.

Questions or suggestions?

Drop an email to contact@bananaorange.com
--------------------------
Spanish

Tutorial de ArtRage – Pressure

Una de las cosas que hace a ArtRage un gran programa es el impasto que dejan sus óleos, es decir el notorio volumen de pintura que queda al aplicar un pincelazo. Esto es controlado por la opción “pressure” (presión)

Es una noción de pintura muy simple, mientras más se cargue el pincel (o el lapiz de la tableta en este caso) más se notará el rastro que deja.

En la siguiente imagen pueden ver como los distintos niveles de presión cambian la manera en que se ve la pintura, también si agregamos thinners la pintura no podrá dejar un rastro muy marcado, puesto que deja una capa muy delgada.


Creo que es algo bastante básico pero interesante de ocupar, usualmente dejo la presión en 100% para obtener un impasto muy grueso y pinceladas marcadas, luego según haga detalles agrego algo de thinners o reduzco un poco el impasto en algunas áreas. Tampoco significa que haya que trabajar así, un ilustrador que conozco ocupa 40% de presión y sus trabajos son increíbles.

Pueden encontrar la opción de pressure en el dialogo de settings.

¿Preguntas o Sugerencias?

Envíen un email a contact@bananaorange.com


Bookmark and Share

Wednesday, May 19, 2010

ArtRage Tutorials – Thinners

Saltar al español

At last!, the first ArtRage tutorial is up, it took me a while to begin with this, I’ve been busy with a new part-time freelance job and, oh well, plenty of stuff actually.

Anyway, the first thing I’m going to write about is the most basic of the ArtRage tools, the oil, which must be the more life like looking oil tool I’ve seen in a software, way better than Painter’s Artists Oils as far as I can tell.

As always one of the first things I notice in a program is how it blends the colors together, while I’m not going to compare it’s blending capabilities to other programs, as I think the only program that doesn’t blend properly is Photoshop (although I haven’t tried the last version), that said, I will discuss something that’s very related to blending, thinners.

As in a real painting (which is the whole point) a thinner is a solvent that dilutes the painting, making it more transparent and well, thin.

Using thinners in ArtRage changes a lot the way the oil acts, as you can see in the image.


The brush strokes that don’t use thinners mix very well and you can even see the impasto, while in the second set of brush strokes you can’t see the impasto, the paint is actually thinner and harder to mix since it’s not transparent yet but it leaves a pretty uniform color. The third set of brush strokes has thinners up to 90%, that means a very thin layer of paint, the colors are mixed more by the opacity than actual painting blending, and since the paper is wet it can leave some stains on it, pretty cool huh?.

The final set of brush strokes shows how different percentages of thinners interact together, you can see how by applying more or less thinners you can actually make the impasto areas more thin, leave chunks of paint here and there, or just make your painting more even.

The thinners option is in the settings dialog along with pressure and loading, the two other basic oil characteristics we'll see in the following tutorials.

See you nex time!

Questions or suggestions?

Drop an email to contact@bananaorange.com
--------------------------
Spanish

Tutorial de ArtRage – Thinners

¡Por fin, el primer tutorual de ArtRage está en el blog, me tomó un tiempo empezar con el porque he estado ocupado con un nuevo trabajo freelance a medio tiempo, y bueno, muchas cosas que hacer en realidad.

De cualquier forma, lo primero que trataré va a ser la herramienta más básica de ArtRage, el óleo, que debe ser uno de los oleos más reales que he visto en un software, mucho mejor que los Artists Oils de Painter desde mi punto de vista.

Como siempre, una de las primeras cosas que noto en un programa es como mezcla los colores, aunque no compararé esta vez sus capacidades de mezcla con otros programas, ya que pienso que el único programa que no mezcla correctamente es PhotoShop (aunque no he probado su última versión). Dicho esto, discutiré algo que está muy relacionado con la mezcla de colores, los thinners (adelgazadores de pintura).

Tal cual una pintura real (que es todo el punto) un thinner es un solvente que diluye la pintura, haciéndola más transparente, y bueno, delgada.

Usar los thinners en ArtRage cambia mucho la manera en la que actúa el óleo, como pueden ver en la imagen.


Los pincelazos que no usan thinners se mezclan muy bien e incluso pueden ver algo del impasto, mientras que en el segundo set de pincelazos ya no se puede ver el impasto ya que la pintura es de hecho más delgada y más difícil de mezclar ya que todavía no es transparente, pero deja un color bastante uniforme al aplicarla. El tercer set de pincelazos tiene los thinners en 90%, eso significa una capa muy delgada de pintura, los colores se mezclan más por la opacidad que por una mezcla real de pintura y ya que el papel se moja de esta manera, pueden quedar algunas manchas de pintura en él, bastante real ¿no?.

El set final de pincelazos muestra como diferentes porcentajes de thinners interactúan juntos, pueden ver como al aplicar más o menos thinners pueden de hecho hacer más delgadas las áreas de impasto, dejar pedazos de pintura aquí y allá o tan solo hacer el pintado más uniforme.

La opción de thinners está en el recuadro de settings junto con pressure y loading, las otras funciones básicas de los óleos que veremos en los siguientes tutoriales.

¡Hasta la próxima!

¿Preguntas o Sugerencias?

Envíen un email a contact@bananaorange.com



Bookmark and Share