After many tutorials about the different aspects of the brushes, It's time to create a whole new brush from scratch, it's nothing complicated and it allows you to create a completely new tool.
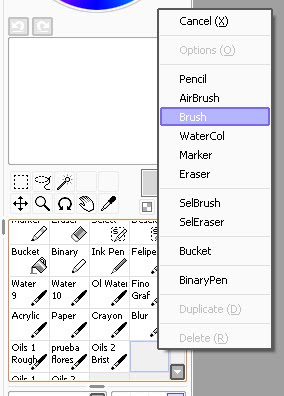
To begin, we'll need to locate the squares where the tools are, we'll right click in a unoccupied spot and select the type of brush we want to create, in this case a brush.

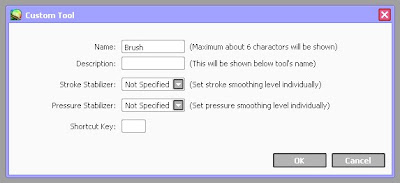
Now you'll be able to see the brush with the default characteristics that SAI creates, this is with simple circle as elemap, no texture, etc. Before we fix this, we'll double click the tool. A dialog will appear.

Here you can name the tool, which appears in the first line of the tool square, and give it a short description, which appears in the second line, this is useful if we have two “pencil” tools for example, one can be a thin pencil, and the other one a broad pencil, and we can tell them apart this way. The stabilizers are not important for now, so you can just leave them be, besides, if you want you can double click the tool later at any time to change the values. Finally, the shortcut key to access the tool, very useful if you plan to use it constantly.

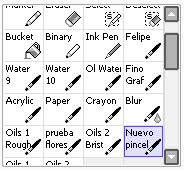
You should have a square similar to the one on the image, with the name you chose obviously.
Now the important part, if you have created an elemap, you can select it where it says simple circle, you can also choose the texture, color blending, dilution, etc. With this, your brush will be complete.
As you can see, it's extremely easy, you don't need to save the changes since when you create the square for the brush that slot will be saved in SAI along with all the other characteristics you use, if you want you can just leave it that way without moving a thing, or you can play with the options, careful though, since the brush is not a fixed tool, and as any brush in SAI it'll have the last values you used on it, so careful moving the characteristics too much if you won't remember them later.
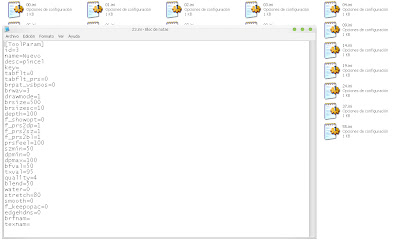
These brushes will be saved in the tolnrm folder in the SAI program folder, there you can see all the .ini files which simbolize a tool according to it's position on the grid, my new tool has the numer 23.
 If you open one of this files you'll be able to see the characteristics of the brush right there, although that's completely unnecesary, what's interesting is that by changing the number on the file itself you can move it around in the grid of the program, since the name dictates it's position.
Finally, remember that if you make any changes done outside the application you must start SAI with the program start-sai.exe or it won't recognize the changes.
Questions or suggestions?
Drop an email to contact@bananaorange.com--------------------------
Spanish
Curso Básico de SAI – Como Crear una Herramienta de Pincel
Después de muchos tutoriales acerca de distintos aspectos de los pinceles, ha llegado el momento de crear un pincel completo, no es nada complicado y permite crear una herramienta totalmente nueva.Para empezar, necesitamos localizar la cuadrícula donde se ubican las herramientas, haremos click derecho en un cuadrado desocupado y pondremos el tipo de herramienta que queremos crear, en este caso un pincel.

Ahora aparecerá el pincel con las características por defecto que trae SAI, es decir con el elemap en simple circle, sin textura, etc. Antes de arreglar esto, hacemos doble click en la herramienta. Aparecerá el siguiente dialogo.

Ahí se puede nombrar la herramienta, lo cual aparecerá en la primera línea del cuadro, y darle una descripción corta, que aparecerá en la siguiente línea, esto sirve por ejemplo si tenemos dos lápices, uno puede ser “Lapiz fino” y el otro “Lapiz grueso”, lo que los hace fáciles de diferenciar. Los estabilizadores no son importantes por ahora, así que los pueden dejar como están, además si quieren pueden hacer doble click en la herramienta en cualquier momento para cambiar sus valores. Finalmente, la tecla rápida para acceder a ella, muy útil si planean ocupar esta herramienta constantemente.

Deberían tener un cuadro parecido al de la imagen, con el nombre que eligieron claramente.
Ahora viene la parte importante, si ya han creado un elemap, pueden elegirlo donde dice simple circle, también pueden elegir la textura, mezcla de colores, disolución, etc. Con esto su pincel quedará completo.
Como pueden ver, es extremadamente simple, no hace falta guardar los cambios ya que una vez se crea el recuadro para el pincel ese slot se guardará en SAI junto con todas las características que uno ocupe, si quieren pueden ocuparlo tal como lo dejaron sin mover nada, o pueden jugar con las opciones, ojo eso si, que el pincel no es una herramienta fija, y como todo pincel de SAI simplemente tendrá las últimas características que hayan utilizado en él, así que cuidado con mover demasiado los valores si no los recuerdan.
Estos pinceles se guardarán en la carpeta toolnrm de SAI, ahí pueden ver todos los archivos .ini, cada cual simboliza una herramienta según su posición en la cuadrícula, mi nueva herramienta tiene el número 23.
 Si es que abren el archivo, pueden ver las características del pincel ahí mismo, e incluso editarlas, aunque es absolutamente innecesario, lo que si es interesante es que cambiando el número del archivo mismo pueden moverlo en la cuadrícula del programa, pues el nombre dicta su ubicación.
Por último recuerden que si hacen cualquier cambio fuera del programa deben empezar sai con la aplicación start-sai.exe o no reconocerá los cambios.


No comments:
Post a Comment